How to backup Azure SQL Server Databases (.bacpac) to Google Cloud SQL

A lot of our customers use Azure SQL Server because they seamlessly integrate with Microsoft Power Automate and Power BI. They also provide an easy way to scale performance by "beefing up" the Database specs.
By default Azure SQL already provides a backup system which creates .bacpac exports of the databases and can be stored wherever administrators like inside Azure. What isn't as easy is having a backup copy or even a mirrored database on another cloud provider, mainly because the only way to export the database data is through .bacpac files and not the .bak extension, which makes it harder to import them.
On this article we explain how to create a transitionally consistent backup of your Azure SQL database and import to Google Cloud SQL in an automated way, allowing this to run on a daily or weekly schedule.
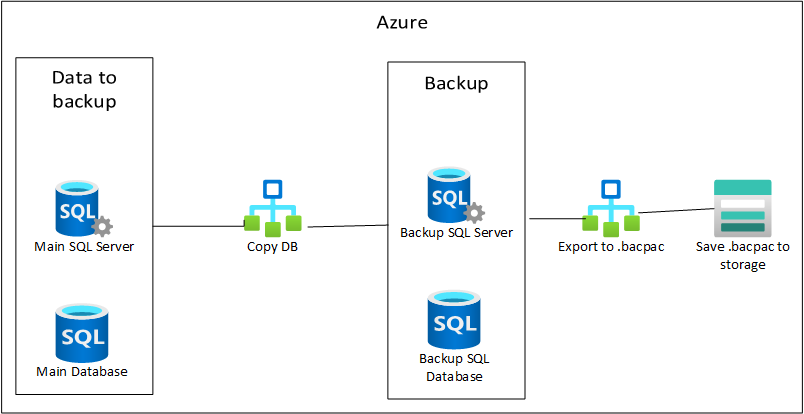
How does it work ?
Here is a quick summary of the steps we'll be making
- Create a copy of the Azure SQL Database to another Azure SQL server
- Export the copied database to .bacpac file and save it on Azure Storage
- Import the .bacpac file into Google Storage through Storage Transfer
- Import the .bacpac file into a Google Cloud SQL Database
Creating a copy of the Azure SQL Database and exporting to .bacpac
Why create a copy and not directly export the database to .bacpac ? Because of transaction consistency and performance impact. If you export to .bacpac SQL Server doesn't assure consistency which means you can have for instance a broken foreign key relationship.
- Create an Azure SQL database to where the copy/backup will be saved.
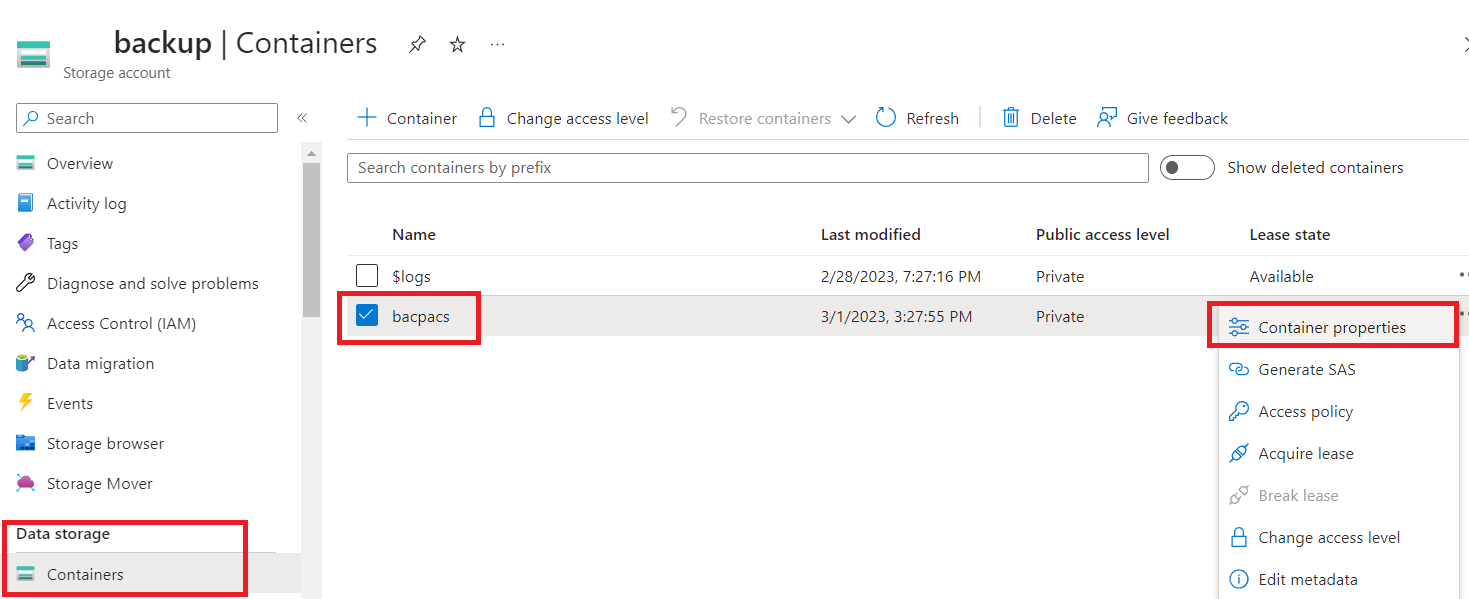
- Create a Storage Account and then a Container called bacpacs. Then check the container properties and copy the URL to replace:(YOUR_CONTAINER_URL).
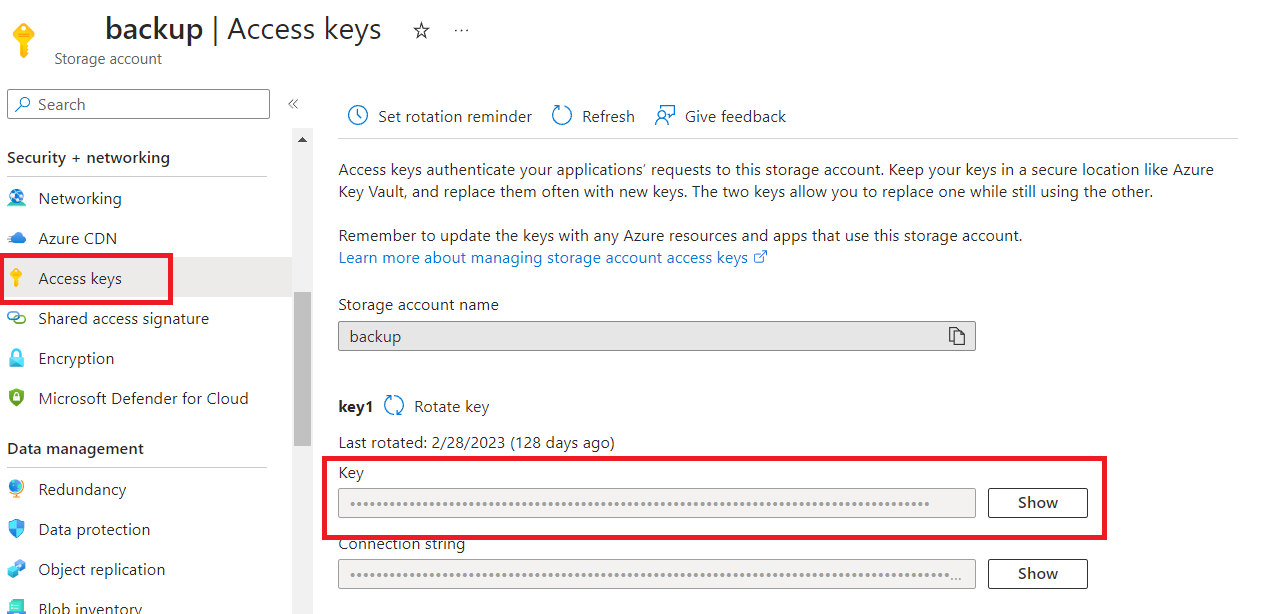
On the left menu click on Access Keys and create a new key and copy its value.To replace:(YOUR_STORAGE_KEY) in the script
- In order to run the powershell script that will be created on the next steps we need to add a
Service Principal with the required permissions
- Service principals are configured with a set of permissions which gives them access to specific resources to execute commands on.
- Create an Application and a Service principal and name it sql_backup
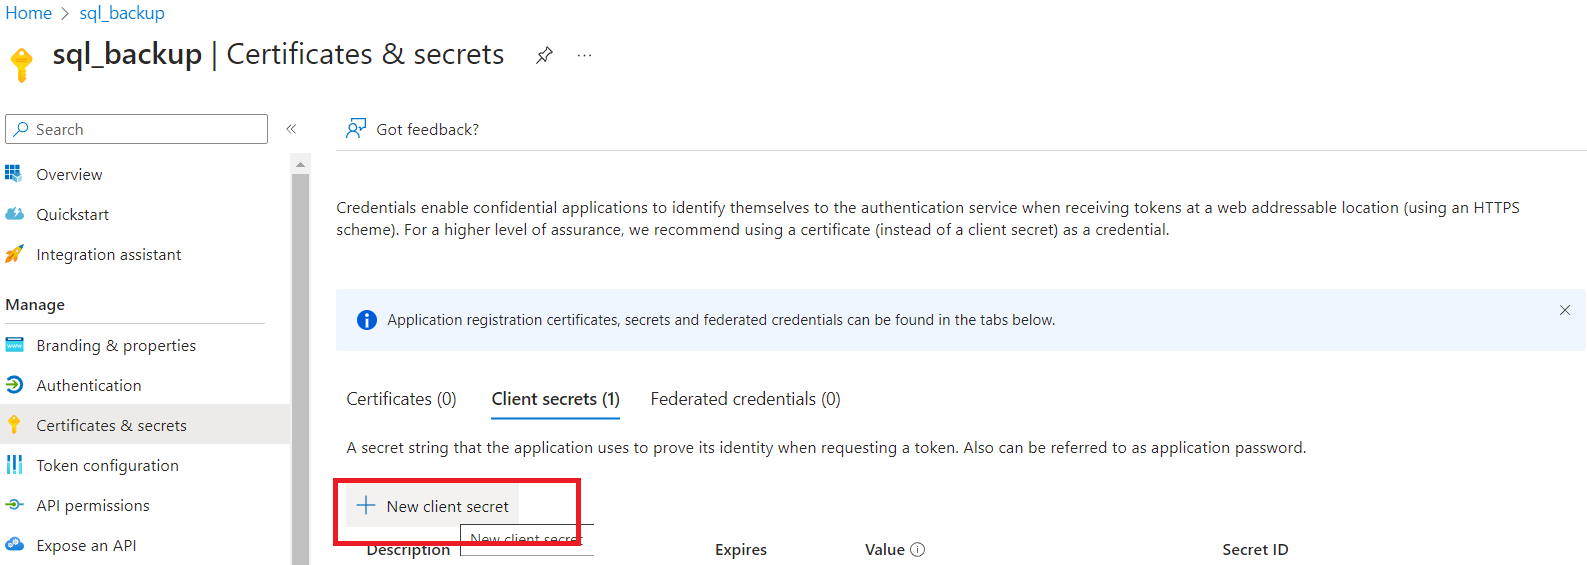
- Create a new client secret and save the value to be used on a latter step. Also
note down the Application (client) ID.
- Finally, we need to assign the necessary SQL Server and Storage permissions to the Service
Principal. Access the SQL server and on the left menu click
Access Control (IAM) and click +Add->Add Role Assigment. Assign to the sql_backup
service principal the roles of SQL DB Contributor and SqlDb Migration Role.
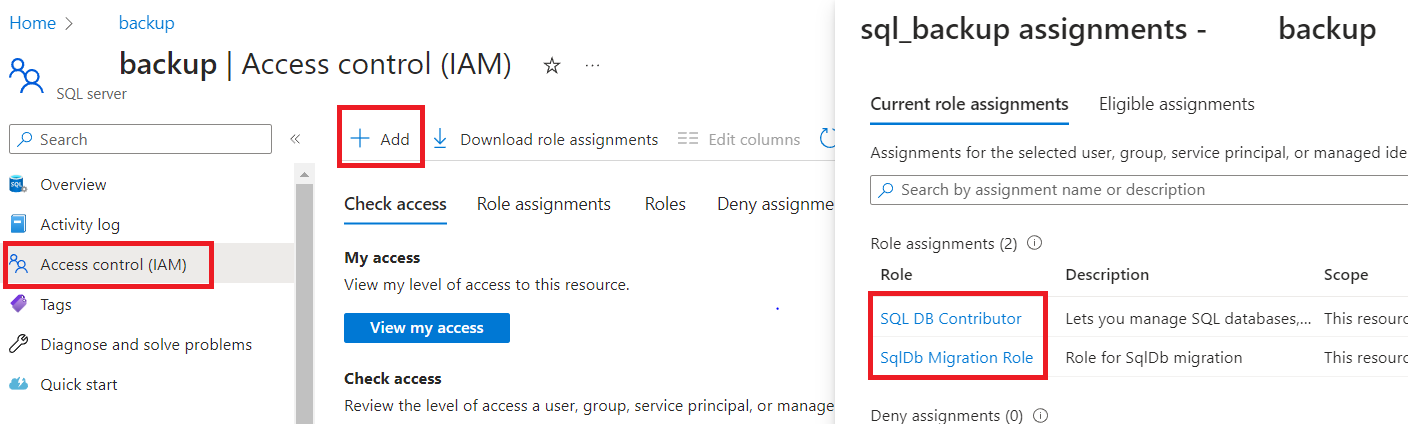
- Do the same for the storage account.Add to the sql_backup service principal the roles Reader and Data Access,Storage Account Contributor and Storage Blob Data Contributor
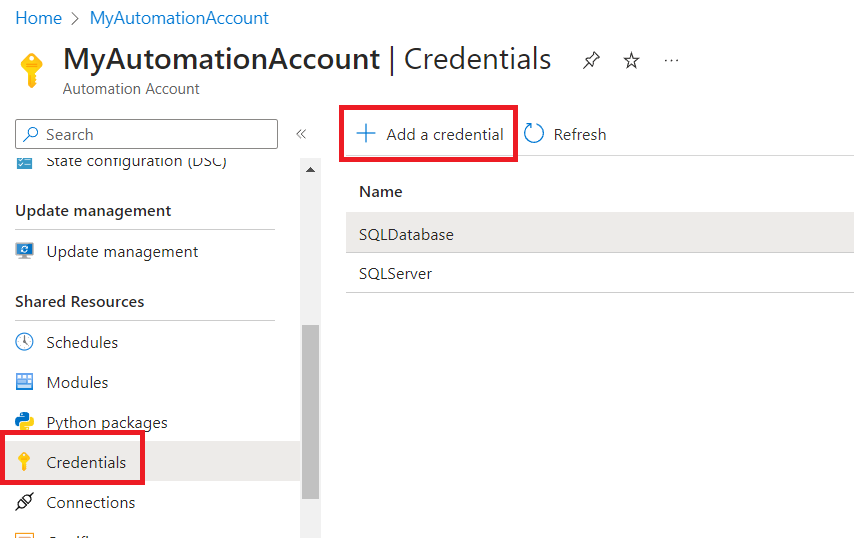
- To run the necessary powershell script we need to Create an Automation Account to hold Automation runbooks.
- Inside the Automation Account create two credentials:
- One for the Service Principal, on the username fill with the Application (client) ID and on the password use the client secret. Call it SQLServer
- Add a second one for the SQL Database with the credentials you used when creating the backup database. Name it SQLDatabase
- On the Automation Account create a new runbook and on the run type select
powershell and on the version choose 7.2
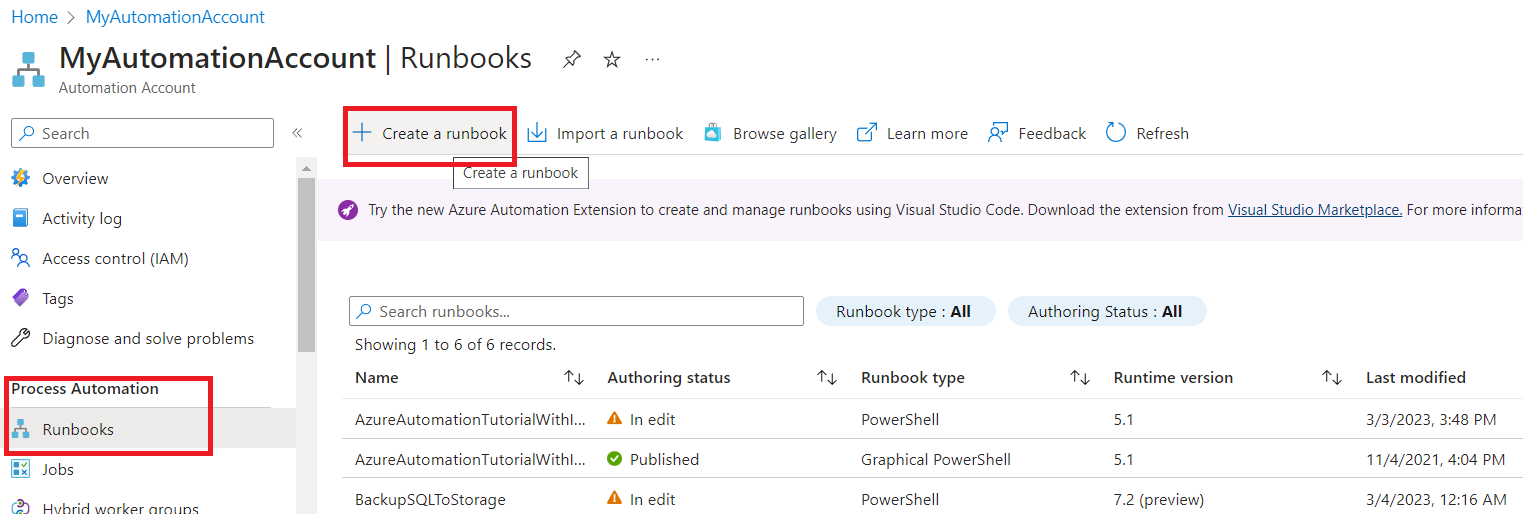
-
Paste the following script on the runbook which will create a copy of the database to the backup
server and then export it to .bacpac file on Azure Storage.Replace all entries starting with YOUR_ with the correct values.
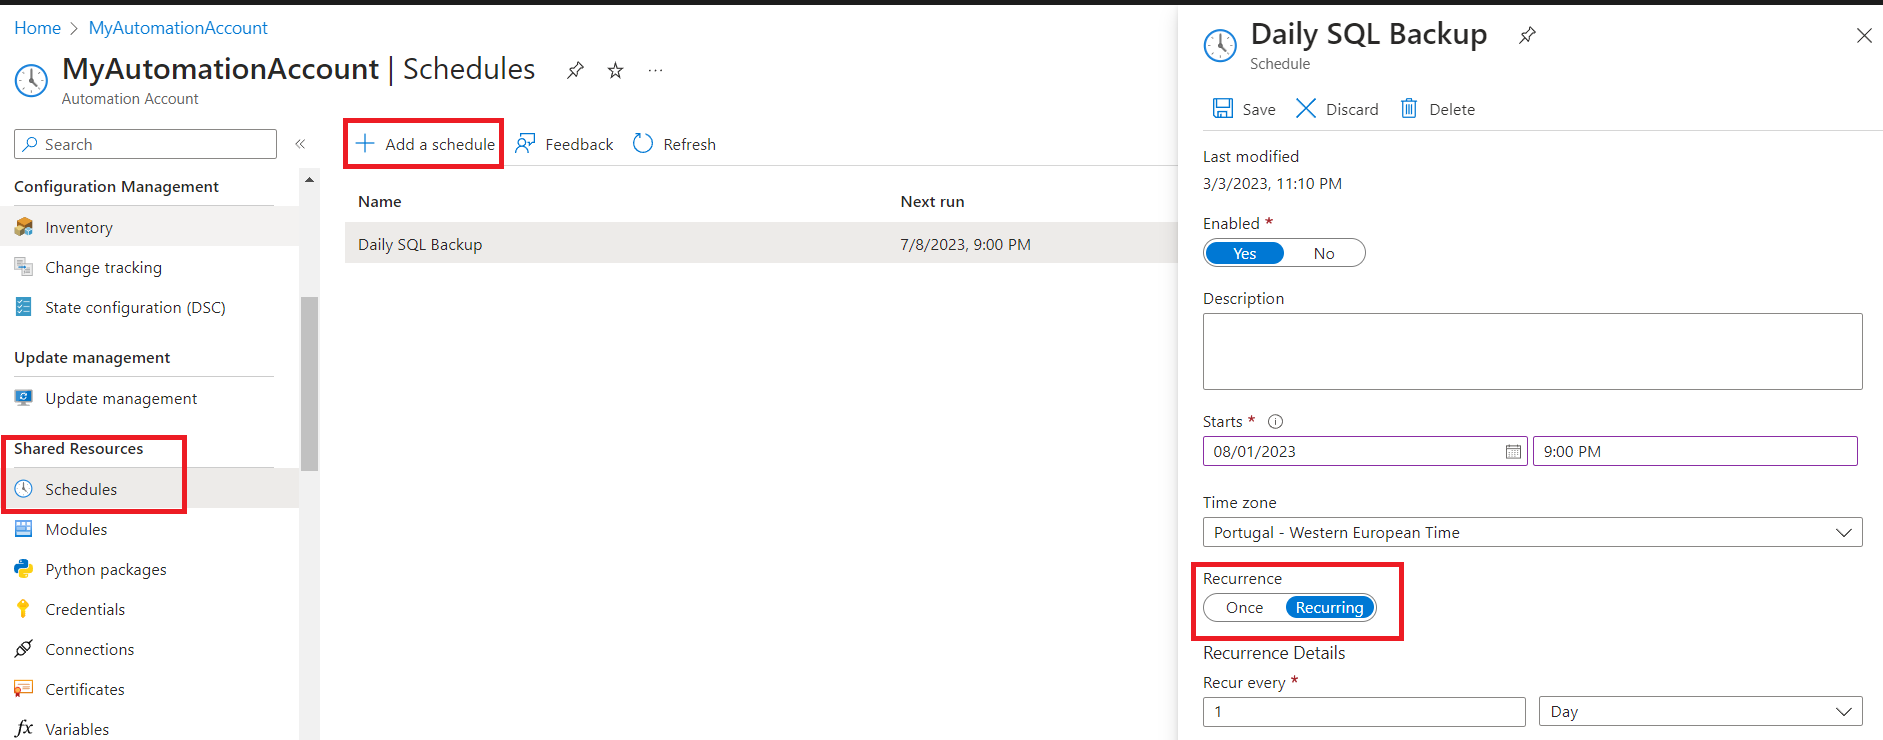
$credential = Get-AutomationPSCredential -Name 'SQLServer' $TenantId = "YOUR_TENANT_ID" Connect-AzAccount -ServicePrincipal -TenantId $TenantId -Credential $Credential # The SubscriptionId in which to create these objects $SubscriptionId = 'YOUR_SUBSCRIPTION_ID' # Set the resource group name and location for your source server $sourceResourceGroupName = "YOUR_MAIN_DB_RESOURCE_GROUP_NAME" # Set the resource group name and location for your target server $targetResourceGroupname = "YOUR_BACKUP_DB_RESOURCE_GROUP_NAME" $sourceServerName = "YOUR_MAIN_DB_SERVER_NAME" $targetServerName = "YOUR_BACKUP_DB_SERVER_NAME" # The sample database name $sourceDatabaseName = "YOUR_MAIN_DB_NAME" $targetDatabaseName = "YOUR_BACKUP_DB_NAME" # Set subscription context Set-AzContext -SubscriptionId $subscriptionId # Copy source database to the target server $databaseCopy = New-AzSqlDatabaseCopy -ResourceGroupName $sourceResourceGroupName ` -ServerName $sourceServerName ` -DatabaseName $sourceDatabaseName ` -CopyResourceGroupName $targetResourceGroupname ` -CopyServerName $targetServerName ` -CopyDatabaseName $targetDatabaseName $credential_sql = Get-AutomationPSCredential -Name 'SQLDatabase' $dateString = Get-Date -Format "dd-MM-yyyy_HH_mm_ss" $backupName = "backup_" + $dateString+".bacpac" $storageURI = "YOUR_CONTAINER_URL"+$backupName $exportRequest = New-AzSqlDatabaseExport -ResourceGroupName $targetResourceGroupname -ServerName $targetServerName -DatabaseName $targetDatabaseName -StorageKeyType "StorageAccessKey" -StorageKey "YOUR_STORAGE_KEY" -StorageUri $storageURI -AdministratorLogin $credential_sql.UserName -AdministratorLoginPassword $credential_sql.Password $exportStatus = Get-AzSqlDatabaseImportExportStatus -OperationStatusLink $exportRequest.OperationStatusLink [Console]::Write("Exporting") while ($exportStatus.Status -eq "InProgress") { Start-Sleep -s 10 $exportStatus = Get-AzSqlDatabaseImportExportStatus -OperationStatusLink $exportRequest.OperationStatusLink [Console]::Write(".") } [Console]::WriteLine("Export done, going to delete the database") Remove-AzSqlDatabase -ResourceGroupName $targetResourceGroupname -ServerName $targetServerName -DatabaseName $targetDatabaseName - Finally, if you'd like to run this runbook periodically click on the Schedule option and create a new one with the desired recurrence.
Then to link the runbook to the schedule go back to the runbooks list and then click on the script entry and then click on the "link to schedule"
Importing the .bacpac file to Google Cloud SQL Server
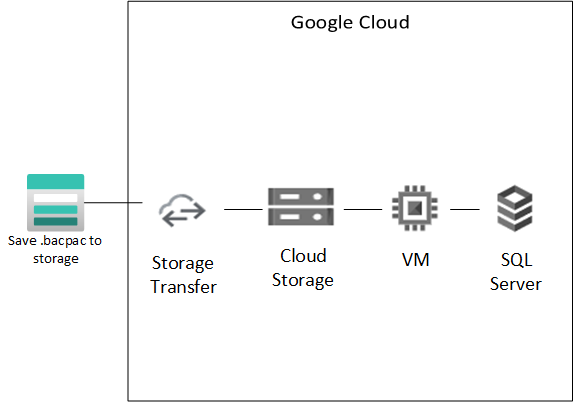
Now we just need to import the .bacpac file on the Azure Storage to the Google storage and then spin a SQL Server with the backup
-
Go to Google Cloud Storage and create a new bucket
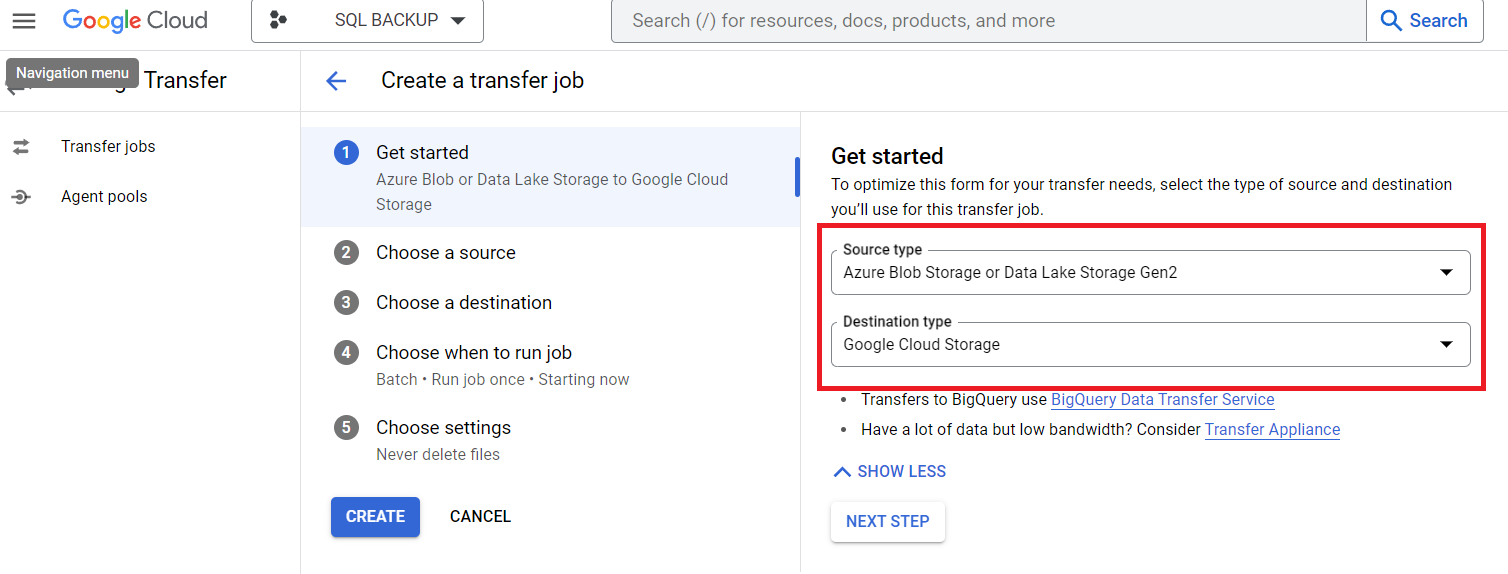
- Create a new Storage Transfer job and select the Data origin from Azure and destination Google Cloud Storage
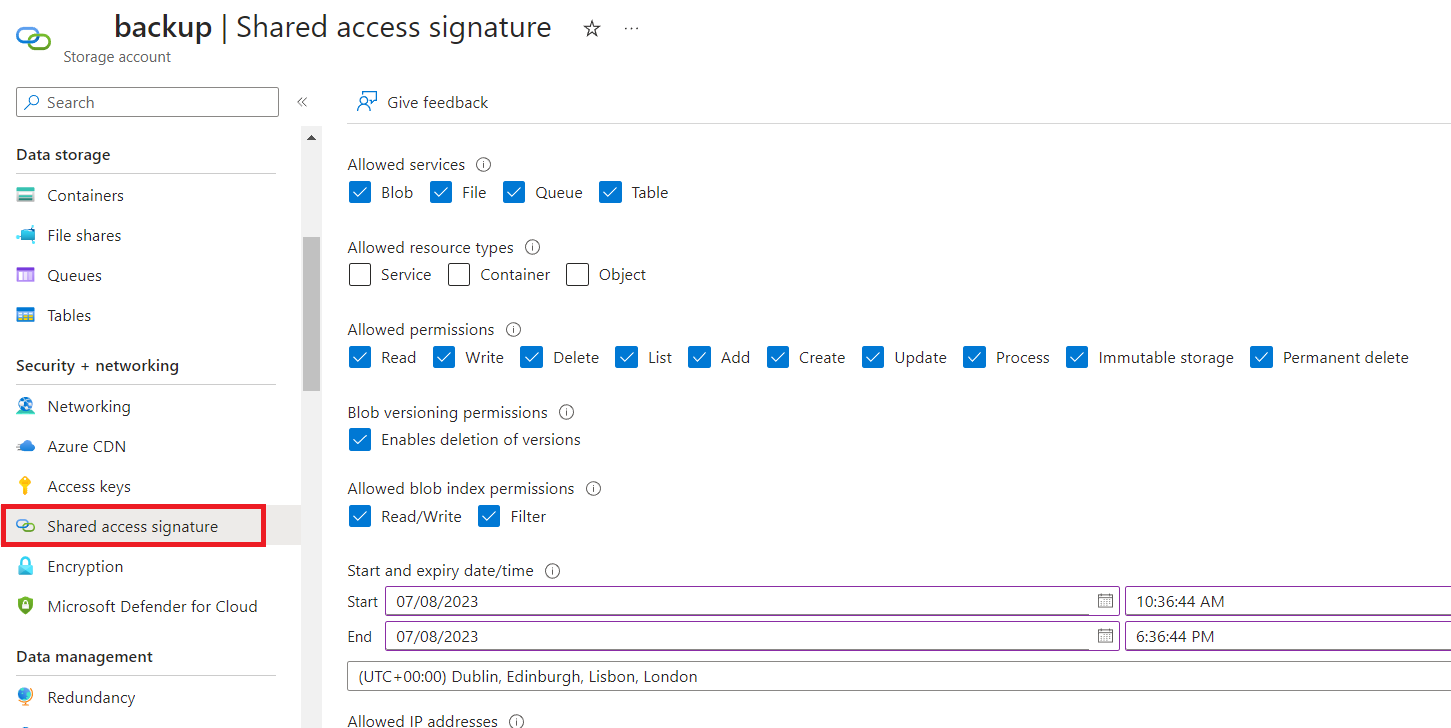
- In order to allow Google Transfer Job to access and import the .bacpac files from Azure Storage you'll need to generate access keys.
On the Azure Storage account click on Shared access signature, select the permissions and copy the signature to
Google transfer job
- Finish the Transfer Job configurations steps.
- If the only thing you need is create a backup of .bacpac file on Google Cloud then you can stop here, but if you would like to make sure the backup is working or even have a second Database running on another cloud provider as a fallback, keep going.
- In order to import the .bacpac file into a SQL Server there are a few requirements:
- Create a SQL Server at least 2019 version on Google Cloud.
- You need to use SQLPackage tool to import the .bacpac file into the SQL Server
- You need a VM to run the import command. The reason we recomend a VM and not an instance of Google Cloud run for instance is the timeout, depending on the size of the DB importing the .bacpac file into the Server can take hours.
- We are going to use a VM running node.js on Google Cloud to run the import command.
- Create a VM instance on Google cloud engine
- Make sure your ip is allowed to connect through ssh to the VM and run:
gcloud auth login gcloud compute ssh [INSTANCE_NAME] --project [PROJECT_NAME] --verbosity debug - Install NVM which will also install node.js
- Install SQLPackage to be able to import the .bacpac file into the SQL Server. Make sure the sqlpackage file is in the same folder as the index.js script we'll create in the next steps.
- To make sure our node.js script is always running even if there is an exception install pm2
npm install pm2 -g - Create a new file called index.js and using npm install the following dependencies:
express,@google-cloud/storage, googleapis and google-auth-library. Then paste the following code:const express = require('express'); const { readFileSync } = require('fs'); const handlebars = require('handlebars'); const { Storage } = require('@google-cloud/storage'); const { google } = require('googleapis'); const app = express(); app.get('/', async (req, res) => { //if the GET parameter backup=true exists if (req.query.backup != 'true') { return res.status(200).send('backup not requested'); } //download bacpac file from google storage const storage = new Storage({ keyFilename: 'YOUR_JSON_KEY_FILE', }); const bucket = storage.bucket('YOUR_BUCKET_NAME'); //list .bacpac files in bucket and download the most recent one const [files] = await bucket.getFiles(); if (files.length == 0) return; files.sort((a, b) => { //conver to utc time const aTime = new Date(a.metadata.timeCreated).getTime(); const bTime = new Date(b.metadata.timeCreated).getTime(); return bTime - aTime; }); await files.at(0).download({ destination: files.at(0).name }); //load google apis using a json key file const auth = new google.auth.GoogleAuth({ keyFile: 'YOUR_JSON_KEY_FILE', scopes: 'https://www.googleapis.com/auth/sqlservice.admin', }); //load auth to google options const options = { auth: auth, }; google.options(options); const client = await auth.getClient(); //patch the sql instance to change the setting activationPolicy to ALWAYS const sql_patch = await google.sqladmin('v1beta4').instances.patch({ auth: client, project: 'YOUR_PROJECT_NAME', instance: 'YOUR_SQL_INSTANCE_NAME', requestBody: { settings: { activationPolicy: 'ALWAYS', }, }, }); //fetch the operation status let sql_operation_status = { data: { status: '' } }; do { sql_operation_status = await google.sqladmin('v1beta4').operations.get({ auth: client, project: 'YOUR_PROJECT_NAME', operation: sql_patch.data.name, }); await new Promise(resolve => setTimeout(resolve,30000)); } while (sql_operation_status.data.status != 'DONE') //fetch ip from aws GET request const my_ip = await fetch('http://checkip.amazonaws.com/'); let ip = await my_ip.text(); //trim new line ip = ip.trim(); //add ip to google cloud sql whitelist const sql_result = await google.sqladmin('v1beta4').instances.patch({ auth: client, project: 'YOUR_PROJECT_NAME', instance: 'YOUR_SQL_INSTANCE_NAME', requestBody: { settings: { ipConfiguration: { authorizedNetworks: [ { name: 'present-ip', value: ip, }, ], }, }, }, }); //fetch the operation status sql_operation_status = { data: { status: '' } }; do { sql_operation_status = await google.sqladmin('v1beta4').operations.get({ auth: client, project: 'YOUR_PROJECT_NAME', operation: sql_result.data.name, }); //wait for 30 seconds await new Promise(resolve => setTimeout(resolve, 30000)); } while (sql_operation_status.data.status != 'DONE') //await new Promise(resolve => setTimeout(resolve, 15000)); //delete a database belonging to the google sql instance const sql_delete = await google.sqladmin('v1beta4').databases.delete({ auth: client, project: 'YOUR_PROJECT_NAME', instance: 'YOUR_SQL_INSTANCE_NAME', database: 'YOUR_DATABASE_NAME', }); //fetch the operation status sql_operation_status = { data: { status: '' } }; do { sql_operation_status = await google.sqladmin('v1beta4').operations.get({ auth: client, project: 'YOUR_PROJECT_NAME', operation: sql_delete.data.name, }); //wait for 30 seconds await new Promise(resolve => setTimeout(resolve, 30000)); } while (sql_operation_status.data.status != 'DONE') console.log("Database deleted going to create a new one"); //create a new database belonging to the google sql instance const sql_create = await google.sqladmin('v1beta4').databases.insert({ auth: client, project: 'YOUR_PROJECT_NAME', instance: 'YOUR_SQL_INSTANCE_NAME', requestBody: { name: 'YOUR_DATABASE_NAME', }, }); console.log("Database created going to import"); await new Promise(resolve => setTimeout(resolve, 15000)); //run sqlpackage const { exec } = require('child_process'); exec(`sqlpackage/sqlpackage /a:Import /tsn:YOUR_SQL_SERVER_IP /tdn:YOUR_SQL_INSTANCE_NAME /tu:sqlserver /tp:YOUR_SQL_PASSWORD /sf:${files.at(0).name} /TargetTrustServerCertificate:True`, (err, stdout, stderr) => { if (err) { //some err occurred console.error(err) } else { exec(`rm ${files.at(0).name}`); // the *entire* stdout and stderr (buffered) console.log("Database imported, powering it off"); //patch the sql instance to change the setting activationPolicy to ALWAYS google.sqladmin('v1beta4').instances.patch({ auth: client, project: 'YOUR_PROJECT_NAME', instance: 'YOUR_SQL_INSTANCE_NAME', requestBody: { settings: { activationPolicy: 'NEVER', }, }, }); } }); return; }); const PORT = process.env.PORT || 8080; app.listen(PORT, () => { console.log( `Hello from Cloud Run! The container started successfully and is listening for HTTP requests on ${PORT}` ); });
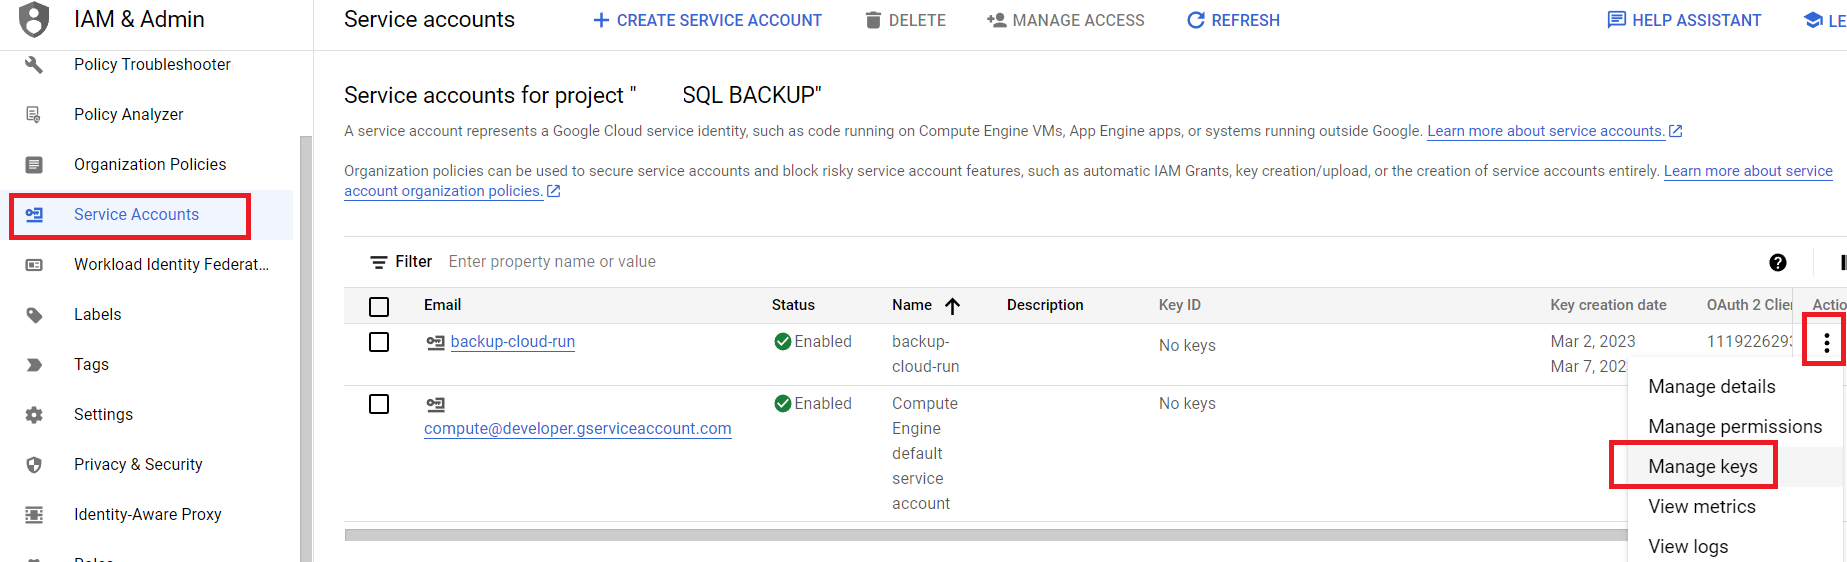
- In order to authenticate with Google Services and run the index.js script, you need to create a Service Account in Google Console, much like what we did with Service Principals in Azure.
- Access Service Accounts page and create a new Service Account with the following roles:
Cloud SQL Admin, Environment and Storage Object Viewer, Storage Admin, Storage Object Admin, Storage Object Viewer, Storage Transfer Admin, Storage Transfer Service Agent - Then click on the more options button and select Manage Keys, generate a new key and download it.
- Upload the .json key to the node.js VM but make sure it's placed on a path not accessible externally.
- Make sure you replace all YOUR_ variables in the code with your values and then finally run the file with
pm2 start index.jsand run the script by going tohttp://YOUR_VM_PUBLIC_IP:8080?backup=true.
Summary:
- Create a backup SQL Server database and Storage accounts in Azure
- Create a Service Account and Give the required permissions to the SQL server and storage buckets
- Use an Automation Account with poweshell script to create a copy of the Database into the Backup server and then export it to a Storage Account in .bacpac format.
- Use Google Transfer Job to import from Azure Storage to Google Cloud Bucket Storage.
- Create a new instance of SQL Server 2019 in Google SQL cloud
- Create a Service Account in Google Cloud console and give the necessary permissions to the Storage and SQL Server
- Create a new Google Compute Engine VM with Node.js installed and SQLPackage
- Run a node.js script to download from the storage account the .bacpac file and then import it to the SQL server using SQLPackage. Authentication should use the newly created Service Account
- Power-off the backup SQL Servers to decrease costs