Sharepoint storage quota problem, how to prevent it and how to fix it
The sharepoint storage problem in Microsoft 365 can be a source of real headaches for tenant administrators. Although OneDrive storage is either 1TB or 5TB (unlimited if you ask Microsoft support) per user, Sharepoint storage, which is what Teams uses, is a lot smaller. To be precise OneDrive is backed by Sharepoint libraries but the storage limits are calculated differently by Microsoft.
In this article will cover:
- How much Sharepoint storage does a tenant have ?
- How to prevent Sharepoint Storage quota from reaching the limit.
- If a Sharepoint storage quota has reached limit, what can I do ?
How much Sharepoint storage does a tenant have ?
Every tenant starts with 1TB plus 10GB per license purchased. But not all licenses will add the 10GB, for instance OneDrive Plan 2 which is the same price as Sharepoint Online Plan 2 doesn't count, but the SP Plan 2 does. This basically means each "user brings 10GB" to the tenant, which is really low, you can check the Sharepoint Storage usage by going to the Sharepoint Admin center and under active Sites (sub menu entry on the left), in the top right corner there is a bar showing space left.
How to prevent Sharepoint Storage quota from reaching the limit.
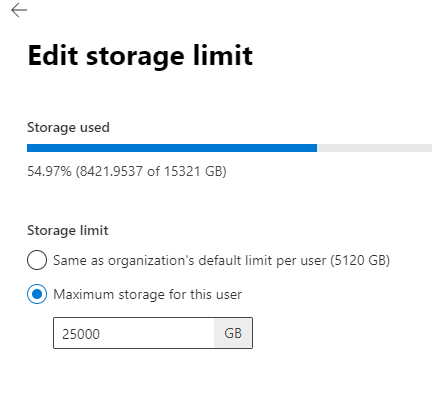
1. Create a storage user which will hold big data that doesn't change frequently: Configure a user called for instance File Storage, assign it Sharepoint Online Plan 2 (this costs 7€/month) , go to the Admin Center, open the user and under OneDrive tab increase the Storage Limit to 25 000GB(25 TB, the theoretical limit). If you get an error saying "The maximum storage limit for this user is 5000 GB" open a ticket with Microsoft Support to increase the size.
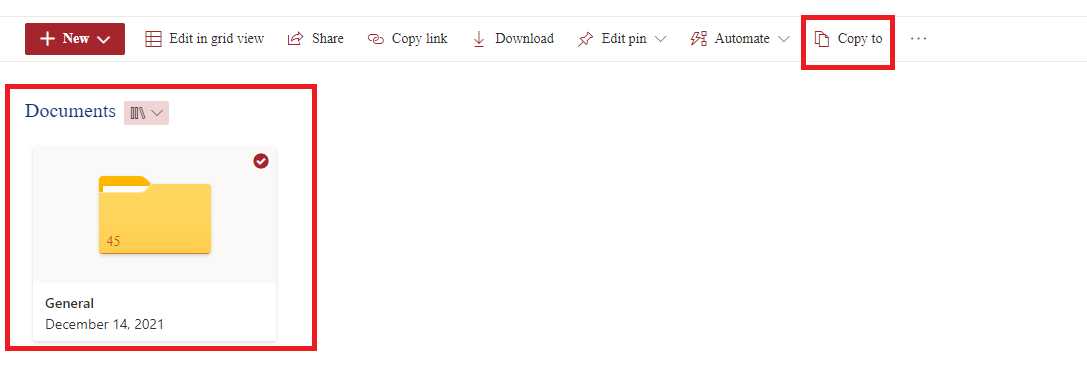
This user's OneDrive should now hold big data like corporate videos and other media that won't change often. It can also be used to back up Teams storage that it's not being used anymore in order to free Sharepoint Storage. To backup a Team site to the file storage user's OneDrive go to the Team Site library, select it and then click Copy to and choose My files on the left menu:
Although these files will be stored on OneDrive, it still is a Sharepoint Library running in the background, so you can still apply Information Rights Management to protect your data if a user leaves the company. Just make sure you click "Return to classic OneDrive" in the lower left corner on the OneDrive page, then "Settings" and "Site Settings". Then click "Site Libraries and Lists" and then "Customize Documents" and finally "Information Rights Management"
2. Train the users to use the right storage at the right time: OneDrive storage should be used for persisting very well-structured files which don't change frequently or when you need to quickly share files for feedback with other users for short review sessions.Teams/Sharepoint storage should be for continuously evolving files with a lot of users contributing at the same time. When a teams job is done, it should be closed and the data backed up on OneDrive.
3. Setup Group expiration rules: users probably won't develop the habit of backing up Teams
when they aren't using them anymore,
so a good alternative is to setup Groups expiration dates when the files aren't accessed for a long
period.
When Group Expiration is active a clock starts running on the respective Team (Teams
are Groups), for instance if the expiration policy is set to
60 days it means if in 60 days none of the following events happen, the Team will expire and the
files will be deleted:
- View, edit, download, move, share, or upload files. (Viewing a SharePoint page does not count as an action for automatic renewal.)
- Visit a teams channel
Group/Teams owners will be notified of the upcoming expiration 30 days, 15 days and 1 day prior to the expiration date. The email sent to the group owner will have a link which allows to renew the expiration date. If the team isn't used anymore, then a backup should be made to the Storage Users (referenced in step 1) and then shared with the team members so the content is searchable through Sharepoint search bar.
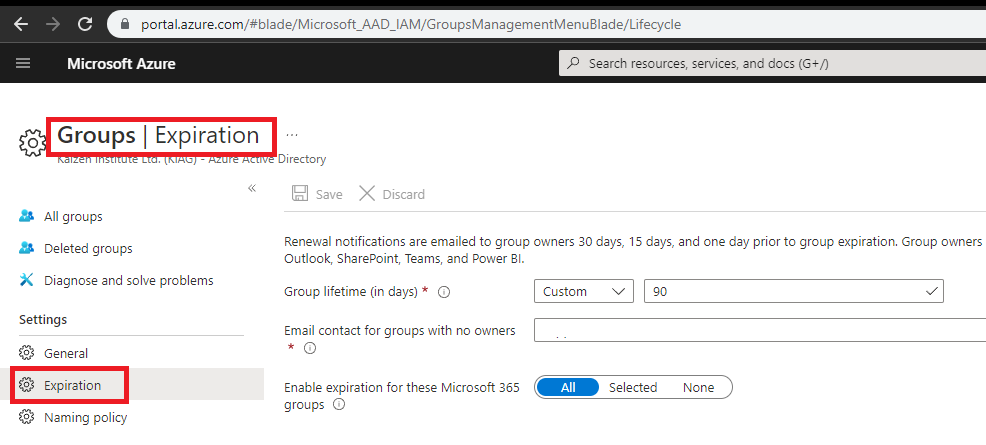
How to setup Group Expiration rules:
- Open groups on the Azure portal
- On the left sub menu under Settings click Expiration
- Set the group lifetime which basically defines how many days left to the expiration date.
- Which groups should be afected, if all or just a selected few. Please keep in mind that if you select "All" and there are a lot of Teams which files weren't accessed in the amount of days you selected, they'll automatically get the expiration date X days in the future. If the X is lower or equal to 30 days a lot of emails will be sent to the owners warning them.
4. Set a low storage quota for Team Sites: teams shouldn't take a lot of storage, they should be used for a period of time for a specific scope and then backed up. A way of making sure your Sharepoint Team sites storage doesn't increase to unreasonable values is configuring storage limits for Teams. You can limit a Team to 50GB and when team members start receiving warnings abouts reaching the space limit, they'll request administrator to increase the storage which will create a good opportunity for some cleaning, like emptying the recycle bin and removing excessive file versioning.
My tenant sharepoint storage quota has reached the limit, what can I do ?
There are basically 3 things you can do, the two obvious ones: buy more storage (which ain't cheap) or clean up the Sharepoint sites taking the most space, and a third one, which isn't as trivial but can recover a lot of space: run a script to clear some file History versions.
In order to view the Sharepoint Sites taking the most space, just go to the Sharepoint admin site, click on Sites -> Active Sites and then order them by size (larger to smaller). Open the sites (you might need to give yourself access permissions first) and then empty the recycle bin and check if there files which can be deleted. You can also check by the access dates and last modified file if the site contents are still in use. If not check with the team owner if you can create a backup and delete the site.
In order to increase Sharepoint's free storage quota you can also delete files history version. By default a Sharepoint library will hold up to 500 file versions, this is how users can rollback changes. Now if you create a 100MB presentation file you can have easily 5GB of used space only for that file.
How to clear sharepoint storage file history versions through a script ?
We are going to present two solutions, one using PowerShell and another using Microsoft Graph REST API
Deleting Sharepoint files history using Sharepoint Online Powershell
First install Pnp Sharepoint Online: Open Windows PowerShell as an Administrator and then run:
Install-Module -Name PnP.PowerShellcreate a new PowerShell Script file named clear_history.ps1 and paste the following code (Most of the following script came from a great site called SharePoint Diary):
$SiteURL = "https://'YOUR_SITE_DOMAIN'-admin.sharepoint.com/"
$UserName = "'YOUR_GLOBAL_ADMIN_USERNAME'" #example: admin@yourdomain.onmicrosoft.com
$Password = "'YOUR_GLOBAL_ADMIN_PASSWORD'"

$SecureStringPwd = $Password | ConvertTo-SecureString -AsPlainText -Force
$Creds = New-Object System.Management.Automation.PSCredential -ArgumentList $UserName, $SecureStringPwd

Function Login {
    [cmdletbinding()]
    param([parameter(Mandatory = $true, ValueFromPipeline = $true)] $Creds)
    Write-Host "Connecting to Tenant Admin Site '$($SiteURL)'"
    Connect-PnPOnline -Url $SiteURL -Interactive
    Write-Host "Connection Successfull"
}

Function CleanHistoryVersions() {
    #by default a sharepoint site holds 500 major versions, you can change how many you'd like there to save space
    $MajorVersionLimit = 10
    Login($Creds)
    #get all modern Team & Communication sites
    $TenantSites = (Get-PnPTenantSite) | Where -Property Template -In ("GROUP#0", "SITEPAGEPUBLISHING#0") | Select Title, Url
    ForEach ( $TenantSite in $TenantSites) {
        #set your admin as the Sharepoint Site admin in order to be able to access it
        Set-PnPTenantSite -Identity $TenantSite.Url -Owners $UserName
        Connect-PnPOnline -Url $TenantSite.Url -Credentials $Creds
        Write-Host $TenantSite.Title $TenantSite.Url
        Try {
            #Get the Context
            $Ctx= Get-PnPContext

            #Exclude certain libraries
            $ExcludedLists = @("Form Templates", "Preservation Hold Library","Site Assets", "Pages", "Site Pages", "Images",
                                    "Site Collection Documents", "Site Collection Images","Style Library")

            #Get All document libraries
            $DocumentLibraries = Get-PnPList | Where-Object {$_.BaseType -eq "DocumentLibrary" -and $_.Title -notin $ExcludedLists -and $_.Hidden -eq $false}

            #Iterate through each document library
            ForEach($Library in $DocumentLibraries)
            {
                Write-host "Processing Document Library:"$Library.Title -f Magenta

                Set-PnPList -Identity $Library.Title -MajorVersions $MajorVersionLimit

                #Get All Items from the List - Exclude 'Folder' List Items
                $ListItems = Get-PnPListItem -List $Library -PageSize 2000 | Where {$_.FileSystemObjectType -eq "File"}

                #Loop through each file
                ForEach ($Item in $ListItems)
                {
                    #Get File Versions
                    $File = $Item.File
                    $Versions = $File.Versions
                    $Ctx.Load($File)
                    $Ctx.Load($Versions)
                    $Ctx.ExecuteQuery()
                    #calculate the file size in MB instead of Bytes
                    $FileSize = $File.Length / 1000000 #MB
                    Write-host -f Yellow "`tScanning File:"$File.Name
                    $VersionsCount = $Versions.Count

                    $VersionsToKeep = 10; #every version after 9th will be deleted
                    If($FileSize -ge 100)#if the file size is bigger than 100MB then lower even more the versions to keep
                    {
                        $VersionsToKeep=5;
                    }
                    $VersionsToDelete = $VersionsCount - $VersionsToKeep
                    If($VersionsToDelete -gt 0)
                    {
                        write-host -f Cyan "`t Total Number of Versions of the File:" $VersionsCount
                        #Delete versions
                        For($i=0; $i -lt $VersionsToDelete; $i++)
                        {
                            $Versions[0].DeleteObject()
                            Write-host -f Cyan "`t`t Deleted Version:" $Versions[0].VersionLabel
                        }
                        $Ctx.ExecuteQuery()
                        Write-Host -f Green "`t Version History is cleaned for the File:"$File.Name
                    }
                }
            }
        }
        Catch {
            write-host -f Red "Error Cleaning up Version History!" $_.Exception.Message
        }
        #Read more: https://www.sharepointdiary.com/2018/05/sharepoint-online-delete-version-history-using-pnp-powershell.html#ixzz7SjmKNzhw
    }
}
CleanHistoryVersions
Please review and update the values of the following: YOUR_SITE_DOMAIN
YOUR_GLOBAL_ADMIN_USERNAME
YOUR_GLOBAL_ADMIN_PASSWORD
$MajorVersionLimit
$VersionsToKeep
How to clear sharepoint storage file history versions through Microsoft Graph REST API ?
In here will present the relevant endpoints instead of ready to use code as it depends on the platform you are consuming the endpoints:
List the site default drive (Documents) and save the ID
GET https://graph.microsoft.com/v1.0/sites/[your_domain].sharepoint.com:/sites/[your_site]:/drive

List children (files/folders) using the Drive ID, if it's the Root drive and not a folder path use /children , instead of :/children
GET https://graph.microsoft.com/v1.0/drives/[SAVED_DRIVE_ID]/children
or if it's a folder
GET https://graph.microsoft.com/v1.0/[FOLDER_PATH]:/children

For each children which is a FILE do:
GET https://graph.microsoft.com/v1.0/[CHILDREN_PATH]:/versions

Finally call DELETE on the versions you'd like to clear:
DELETE https://graph.microsoft.com/v1.0/[CHILDREN_PATH]:/versions/[version_number].0